You can export or import data in Finance and Operations apps by using the Data management workspace. Validate the data by staging the source data, and then move it to the target tables in the Finance and Operations apps database.
Learning objectives
In this module, you will learn how to:
- Identify the correct pattern for a given scenario to use the Data management platform for integration by using data entities.
- Work with the Data management workspace.
- Export data from a legal entity.
- Import data into a legal entity.
- Work with data import and export jobs.
- Clean up the staging tables.
Data management concepts
The data management framework consists of the following concepts:
- Data entities – A data entity is a conceptual abstraction and encapsulation of one or more underlying tables. A data entity represents a common data concept or functionality, for example, customers or vendors. Data entities are intended to be easily understood by users who are familiar with business concepts. After data entities are created, you can reuse them through the Excel add-in, use them to define import/export packages, or use them for integrations.
- Data project – A data project is automatically created when you select Import or Export from the workspace and should have at least one job. It contains configured data entities, which include mapping and default processing options. A data project allows users to configure the entities that should be part of the project, and defines the format that is used for each entity. It allows users to define the mapping that is used from the source file to the staging, and specify the default processing options.
- Data job – This is a job that contains an execution instance of the data project, uploaded files, schedule (recurrence), and processing options. A data job is used to perform the actual import or export operation. It contains the uploaded files, the schedule or recurrence information, and the processing options to use for the job.A data job is created when the import or export operation is performed. The data job creates an instance of the data project and runs it. If you’re doing an unplanned import or export, then there’s typically only one job for each data project. If it is being done multiple times with different data, then you can use the same data project to import data multiple times by using different jobs.Each data project can have one or more data jobs. For instance, if you’re doing a single unplanned data import, then you might have one file that is being imported. In this case, there is a single data project that then has one data job.Another scenario is that you might be importing data using the same data project multiple times, but with different data. In this case, there can be more than one data job for a single data project. Each data job can have one or more job histories.For instance, a data job might be run multiple times after errors have been fixed. The job history tells you the details, such as the time taken to run the job, the number of records processed, and the errors during processing.
- Job history – Histories of source to staging and staging to target jobs. Once a job has been run, you can see the job history, which contains the run history for each execution run of the data job and the history of the data move from source to staging and from staging to target.The Job history tab in the Data management workspace shows all job histories for the import and export data projects. From Job history, you can view the run history for the source to staging and staging to target steps. Each project can have multiple jobs, which in turn have executions. By using the job history, you can view the execution details and determine the time it took to run the job, the number of records that were processed, and so on.
- Data package – Data packages are key concepts for many application lifecycle management scenarios, such as copy configuration and data migration. A single compressed file that contains a data project manifest and data files. This is generated from a data job, and is used for the importing or exporting of multiple files with the manifest. Once a data project is defined, including the data entities and the mapping and sequencing between these data entities, you can then create a data package. The data package can then be used to move the definition of the data project from one environment to another.Users can generate a data package from a data job. To create a data package, go to the Data management workspace, load the project that you want to create the data package for, and then select Download. This generates a zip file.The zip file contains the package header and the manifest. The manifest defines the settings of the data project. The data package can be used to copy the settings of your data project from one environment to another.
Data management platform
By using the data management framework, you can quickly migrate reference, master, and document data from legacy or external systems. It provides features to import data into a staging environment, perform basic data quality services or validation operations on this data, and allow you to validate and cleanse the data.
The data management platform also has features that allow you to map data from input to the target and do pre and post-processing on data. If you export data, the source is Finance and Operations apps, and if you import data, the target is Finance and Operations apps.
The framework is intended to help you quickly migrate data by using the following features:
- You can select only the entities you need to migrate.
- If an import error occurs, you can skip selected records and choose to proceed with the import by using only the good data, opting to then fix and import the bad data later. You will be able to partially continue and use errors to quickly find bad data.
- You can move data entities straight from one Finance and Operations apps system to another, without having to go through Excel or XML.
- Data imports can be easily scheduled by using a batch, which offers flexibility when it is required to run. For example, you can migrate customer groups, customers, vendors, and other data entities in the system at any time.
The data management framework supports using data entities in the following core data management scenarios:
- Data migration – You can migrate reference, master, and document data from legacy or external systems.
- Set up and copy configurations – you can use this to copy configuration between companies or environments and configure processes or modules by using the Lifecycle Services (LCS) environment.
- Integration – This is used where the real-time service-based integration is needed, or when you need an asynchronous integration. The real-time integration does not have a staging area and is directly processed by the services layer.
Data migration
This is an initial or unplanned data load that is performed manually by using the user interface. The scenarios where one uses this pattern could be when a functional user has some data in a source, such as an Excel workbook that needs to be imported from a legacy system to Finance and Operations apps during data migration.
Data flow
The first step is to load the file from the source to the central storage, such as Azure. Then, the data import/export framework picks up the data from the central storage and then pushes it into the staging tables of Finance and Operations apps. Then from staging, the data is moved to the target by using data entities that have been defined. This flow of data can be done either row-by-row or by using a set base of the data entities for the entire underlying tables for each data entity. The sequence and order in which the target tables will be populated can be controlled by using the sequence entity feature of Finance and Operations apps.
Use data entities for data management and integration
Data entities provide conceptual abstraction and encapsulation (de-normalized view) of underlying table schema that represent data concepts and functionalities.
After data entities are created, you should be able to reuse them for Excel add-ins, import and export, or integration scenarios. A data entity is an abstraction from the physical implementation of database tables.
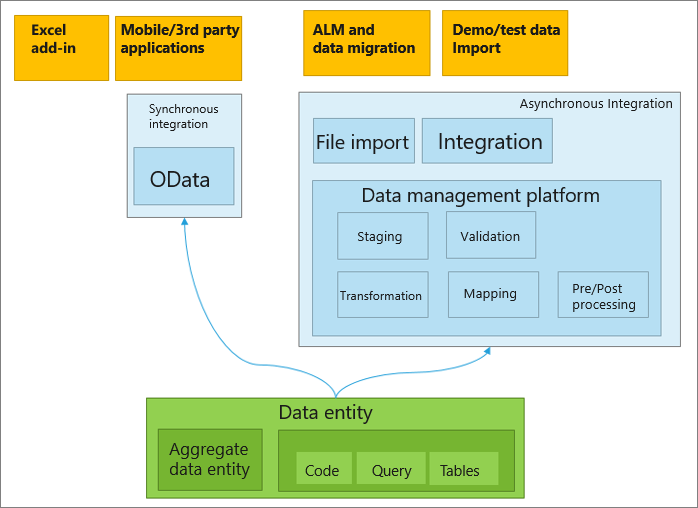
This image presents data entity integration scenarios.
For example, in normalized tables, a lot of the data for each customer might be stored in a customer table, and then the rest might be spread across a small set of related tables. In this case, the data entity for the customer concept appears as one de-normalized view, in which each row contains all the data from the customer table and its related tables.
A data entity encapsulates a business concept into a format that makes development and integration easier. The abstracted nature of a data entity can simplify application development and customization. Later, the abstraction also insulates application code from the inevitable churn of the physical tables between versions.
A data entity has the following capabilities:
- It provides a single stack to capture business logic, enable scenarios such as import and export, and integration, and support additional logics by a developer adding code.
- It becomes the primary mechanism for exporting and importing data packages for Application Lifecycle Management (ALM) and demo data scenarios.
- It can be exposed as OData services, and then used in tabular-style synchronous integration scenarios and Microsoft Office integrations.
Entity example
A consumer wants to access data that is related to a customer object, but this data is currently scattered across multiple normalized tables, such as DirParty, CustTable, LogisticsPostalAddress, and LogisticsElectronicAddress.
Therefore, the process of reading and writing customer data is tedious. Instead, the following customer entity can be designed to encapsulate the entire underlying physical schema into a single de-normalized view. This enables simpler read and write operations, and enables abstraction of any internal interaction between the tables.
Categories of entities
Entities are categorized based on their functions and the type of data that they serve. The following are five categories for data entities:
- Parameters
- Reference
- Master
- Document
- Transactions
Parameters
- Functional or behavioral parameters.
- Required to set up a deployment or a module for a specific build or customer.
- Can include data that is specific to an industry or business. The data can also apply to a broader set of customers.
- Tables that contain only one record, where the columns are values for settings. Examples of such tables exist for Accounts payable (AP), General ledger (GL), client performance options, workflows, and so on.
Reference
- Simple reference data, of small quantity, that is required to operate a business process.
- Data that is specific to an industry or a business process.
- Examples include units, dimensions, and tax codes.
Master
- Data assets of the business. Generally, these are the “nouns” of the business, which typically fall into categories such as people, places, and concepts.
- Complex reference data, of large quantity. Examples include customers, vendors, and projects.
Document
- Worksheet data that is converted into transactions later.
- Documents that have complex structures, such as several line items for each header record. Examples include sales orders, purchase orders, open balances, and journals.
- The operational data of the business.
Transactions
- The operational transaction data of the business.
- Posted transactions. These are non-idempotent items such as posted invoices and balances. Typically, these items are excluded during a full dataset copy.
- Examples include pending invoices.
Configuration keys and data entities
Before you use data entities to import or export data, we recommended that you first determine the impact of configuration keys on the data entities that you are planning to use.
To learn more about configuration keys in Finance and Operations apps, refer to the License codes and configuration keys report.
Configuration key assignments
Configuration keys can be assigned to one or all of the following artifacts.
- Data entities
- Tables used as data sources
- Table fields
- Data entity fields
Supported integrations
Data management by using data entities can support the following integrations:
- Synchronous service (OData) – Data entities enable public application programming interfaces (APIs) on entities to be exposed, which enables synchronous services. This method is used for Office integration and third-party mobile app integrations
- Asynchronous integration – Data entities also support asynchronous integration through a data management pipeline. This enables asynchronous and high-performing data insertion and extraction scenarios. This method is used for interactive file-based import/export and recurring integrations.
- Business intelligence – By using the aggregate measures available in Finance and Operations apps, built-in controls such as charts and integration with Power Platform, provides reports to offer insights to business data.
Data migration from legacy or external systems
After the initial deployment is up and running, the system implementer will migrate existing data assets of the customer into Finance and Operations apps, such as:
- Master data (for example, customers and vendors)
- Subsets of documents (for example, sales orders)
You can use the data management framework to copy configurations between companies or environments, and configure processes or modules by using Lifecycle Services (LCS).
Copying configurations is intended to make it easier to start a new implementation, even if your team doesn’t deeply understand the structure of data that needs to be entered, data dependencies, or which sequence to add data to an implementation.
The data management framework allows you to:
Move data between two similar systems.
- Discover entities and dependencies between entities for a given business process or module.
- Maintain a reusable library of data templates and datasets.
- Use data packages to create incremental data entities. Data entities can be sequenced inside the packages. You can name data packages, which can be easily identifiable during import or export. When building data packages, data entities can be mapped to staging tables in grids or by using a visual mapping tool. You can also drag-and-drop columns manually.
- View data during imports, so you can compare data and ensure that it is valid.
Work with the Data management workspace
This unit explains how to work with the Data management workspace in Finance and Operations apps.
The Data management workspace provides access to important tasks for data management. It also provides information about projects and project execution tasks.
After you’ve created a configuration data project, it appears in the Data projects grid in the Data management workspace.
For each project, the type of configuration (import or export) and the project category (Project, Configuration, Integration, or Other) are shown. Use the options to the left of the grid to filter by the appropriate project. The project definition is shared across legal entities

To open a project, select the project, and then select Load project to open the Import or Export page. Use the Delete button to delete the selected projects.

You can also download the project definitions by using the Download button. Use Job history to find more details about the projects that you’ve run. Use the data range filters to filter by the dates when data projects were run. You can view execution details by selecting a job and then using the Execution details menu.

For export tasks, you can also download the data from the workspace by using the Download page button. The available projects in the Data management workspace are as follows:
- Export
- Import
- Copy into legal entity
The All projects option is a filter to decide which type of project in the workspace to work with.

Sequencing
Two types of sequencing should be considered when you are working with data entities.
- Sequencing data entities within a data package
- Sequencing the order of data package imports
Sequence data entities within a data package
- When a user adds data entities to a data project, by default, a sequence is set for the order in which the entities will load. The first entity added to the project will be set as the first entity to load, the next entity added will be second, the next entity will be third, and so on.
- For example, if a user added two entities in this order, Sales tax codes and Sales Tax groups, then Sales tax codes is assigned an entity sequence of 1.1.1, and Sales tax groups is assigned an entity sequence of 1.1.2. The sequence level indicates that the second entity will not start the import process until the first level is finished.
- To view or edit a sequence, select the Entity sequence button (available only in Standard view) on the Action Pane of the data project.
- In the Definition group entity sequence, you can view the execution units and the sequence. You can change sequence by selecting the data entity in the list, setting a different Execution unit or Sequence in level, and then selecting Update selected. After selecting Update selected, the entity will move up or down in the entity list.To continue with the example in step 2, to successfully import sales tax codes and groups, the sales tax codes and details have to be loaded before sales tax groups can be imported. Sales tax codes and groups are all in Execution unit = 1, but the sequences are in the order that they will be imported. Other related sales tax entities that are not dependent upon other data entities being loaded are included in the package.For example, the sales tax exempt numbers entity is set in its own Execution unit = 2. This data entity will start loading immediately because there are no dependencies on other entities loading before it.Finance and Operations apps can determine the sequences of selected data entities in a project by selecting the Auto sequence button.
Sequence data package imports
To successfully load data, it’s important to set the correct order for importing data packages because of dependencies that exist within and across modules. There is a suggested numbering format that has been created for the data packages within Lifecycle Services (LCS), so you can identify which data packages you need to load first.
This could be as follows:
- First segment: Module
- Second segment: Data type (setup, master, transaction)
- Third segment: Sequence number
Mapping
When you are working with data entities, mapping an entity to a source is automatic. The automatic mapping of fields can be overridden, if needed.
To view how an entity is mapped, locate the tile for the entity in the project, and then select View map.

The Data management framework provides a mapping visualization view (default) and a mapping details view. A red asterisk (*) identifies any required fields in an entity. These fields must be mapped for you to be able to work with the entity. Other fields can be unmapped as required when you are working with the entity.
- To unmap a field, highlight the field in either column (Entity or Source), select Delete selection, and then select Save. After the changes are saved, close the form to return to the project.
After import, you can also edit the field mapping from source to staging by using the same process.

Regenerate a map
If you have extended an entity (added fields) or if the automatic mapping appears to be incorrect, the mapping of the entity can be regenerated in the Mapping page.
- To do this, select Generate source mapping. A message will display asking, “Do you want to generate the mapping from scratch?”
- Select Yes to regenerate the mapping.
Generate data
If you have fields in entities that you want the system to generate data for on import, instead of providing the data in the source file, you can use the auto-generated functionality in the mapping details for the entity. Please note that the following image shows the export project; therefore, the auto-generated mapping is not available because the Finance and Operations apps data entities are the source data of your project.

However, notice that in the import project, the data source is coming from other systems, such as those legacy applications. Finance and Operations apps uses the business logics of each data entity, discovers the dependencies, and sequences the data entities based on their relationships and dependencies.
For example, if you want to import customers and customer address information, but the address information was not previously imported with the Global Address Book (GAB) entities, you can have the entity auto-generate the party number upon import and the GAB information will be created. To access this functionality, view the map of the entity, and then select the Mapping details tab. Select the fields that you want to auto-generate. This will change the source field to Auto.

Using Standard and Enhanced views for tiles
There are two views available to work with in data management projects, the Standard and Enhanced views.
When you are in a project either as import or export, the Entity sequence button is only available in Standard view.
Both views show all available tiles in the Data management framework. However, the Enhanced view gives more detailed information and control over the project than the Standard view.
The following image shows the tiles that are available in the Standard view.

The following image shows the tiles that are available in the Enhanced view.

Prior to managing data import and export, you need to configure these tiles to successfully create, manage, and run the jobs to perform the data management activities.
Use templates in data management
Completed100 XP
- 6 minutes
Default templates are delivered together with each new release of Finance and Operations apps. Our long-term goal is to provide the templates in Lifecycle Services (LCS) so that you can push them to an instance of Finance and Operations apps. However, for the current releases, select the Templates tile in the Data management workspace, and then select Load default templates to load the templates. To see the Load default templates menu, you must use Enhanced view.
We recommend using the Enhanced views to have more features and flexibility while working with your projects.
After the templates are loaded, you can change them to suit your business requirements. If you ever want to retrieve the original default templates, you can use the Load default templates button to add them back to your system. The templates will then be replaced with the latest versions. If you’ve made changes to the templates, you can make a copy of the old templates by exporting them.
Note that system administrator access is required to load default templates and import templates. This requirement helps guarantee that all entities are correctly loaded into the template.
For the newly deployed environment of Finance and Operations apps, the default templates are not loaded. We recommend that you select the Load default templates button to view the default templates.

When the Load default templates dialog box appears, you can select single, multiple, or all templates to be loaded into your environment.

Levels 10 to 22 are reserved for shared system entities so that those entities are processed first. Almost all systems also use the company-specific general ledger entities. Therefore, level 25 is reserved for those entities. These levels represent the minimum basic setup that is required for most shared data in a configuration.
After the basic setup is completed, many entities can be loaded in parallel across all the modules. These entities don’t have to be loaded in silos by module. Instead, you can set up bands of dependencies between the data for different entities. Entities that have no dependencies are added to band 30 in this example. Band 40 is added for entities that have a dependency on the entities in band 30. The same process is continued for bands 50 to 90.
After organizing the basic entities so that they can be processed in parallel, the remaining entities are organized by module, in the order that the modules should be processed in. However, many entities have many dependencies, some of which are complex.
For example, the Vendor posting profiles entity might require Vendors or Items entities. Although the Vendor posting profiles entity is in the Accounts payable module, it must be processed after the Product management module. In that case, if Vendors entities are 1.130.10 and Items entities are 1.300.10, the Vendor posting profiles entity must be moved so that it’s after that sequence (for example, 1.310.20).
Note
The sequences that we have implemented are a guideline, not a requirement. There is no required relationship between a level and a module. You can rearrange the entities if the sequence doesn’t work for your implementation. To add your own templates to a configuration, you can follow the preceding guidelines to help guarantee that your template is correctly merged into a project that uses default templates.
Templates that have the same entity
Some entities are required in more than one template. For example, you must have payment terms in both the Accounts payable and Accounts receivable templates. However, you might require only the Accounts receivable template. We added the entity to both templates for situations where you require only one of them.
A data project can include only one instance of an entity. If you add a template, and the template contains an entity that already exists in a data project, the entity in that template replaces the entity that is currently in the project.
You can use this capability to override the default templates without changing them. For example, the worker field hasn’t been mapped in your data project, but you have your own template that adds workers. In this case, you can build a template that includes the entities that have the worker field. In that template, you can map the worker field. Any entities in the data project that don’t have the field mapped will then be replaced.
Merged templates
We have created larger templates that cover multiple module areas. You can use the larger templates, or any combination of smaller templates, to build a data project. The following combined templates are available:
- System and Shared – Include system setup, global address book, shared general ledger, and workflow.
- Financials – Includes general ledger, bank, accounts payable, tax, accounts receivable, fixed assets, and budgeting.
- Supply chain management – Includes inventory management, product management, procurement, sales and marketing, limited warehouse management, production control, and costing.
- Expense and Project Management – These templates aren’t included in a larger template. However, they are designed so that they can easily be merged into a project that uses other templates.
- Workers – Includes the entities needed to add workers and re-map entities where the worker mapping was removed.
Master data
Many default templates include entities for master data, such as customers, vendors, and released products. These entities are included to indicate the correct sequence of entities that you will require after you’ve loaded parameters and reference data. Master entities are most often sequenced in the module bands that are numbered 100 and above. In the grid, the entity category for these entities will be Master. If you don’t want to include master data or any other entities in your configuration, remove those entities from your project.
Enable change tracking for entities
Change tracking enables incremental export of data from Finance and Operations apps by using Data management. In an incremental export, only records that have changed are exported. To enable incremental export, you must enable change tracking on entities.
If you don’t enable change tracking on an entity, you can only enable a full export each time. For bring your own database (BYOD) use cases, change tracking can also track deletes, if the entity supports this.
Export, import, and copy data into a legal entity
This unit explains how to copy data into a legal entity, and how to import and export data in Finance and Operations apps.
Data import and export jobs
To create and manage data import and export jobs in Finance and Operations apps, you can use the Data management workspace. By default, the data import and export process creates a staging table for each entity in the target database. Staging tables let you verify, clean up, or convert data before you move it.
The following are steps to import or export data.
- Create an import or export job, where you will complete the following tasks:
- Define the project category.
- Identify the entities to import or export.
- Set the data format for the job.
- Sequence the entities so that they are processed in logical groups and in an order that makes sense.
- Determine whether to use staging tables.
- Validate that the source data and target data are mapped correctly.
- Verify the security for your import or export job.
- Run the import or export job.
- Validate that the job ran as expected by reviewing the job history.
- Clean up the staging tables.
Create an import or export job
A data import or export job can be run one time or as many times as needed. We recommend that you take the time to select an appropriate project category for your import or export job. Project categories can help you manage related jobs.
When you select an entity, you must select the format of the data that will be exported or imported. You can define formats by using the Data sources setup tile. A source data format is a combination of Type, File format, Row delimiter and Column delimiter.
Entities can be sequenced in a data template or in import and export jobs. When you run a job that contains more than one data entity, you must make sure that they are correctly sequenced. Primarily, you sequence entities to address any functional dependencies among entities. If entities don’t have any functional dependencies, they can be scheduled for parallel import or export.
Verify the security for your import or export job
Access to the Data management workspace can be restricted so that non-administrator users can access only specific data jobs. Access to a data job implies full access to the run history of that job and access to the staging tables. Therefore, you need to make sure that appropriate access controls are in place when you create a data job.
Use the Applicable roles menu to restrict the job to one or more security roles. Only users in those roles will have access to the job. You can also restrict a job to specific users. Securing a job by users instead of roles provides more control when multiple users are assigned to a role.
A job can be secured by roles, users, and legal entity at the same time. Data jobs are global in nature. Therefore, if a data job was created and used in a legal entity, the job will be visible in other legal entities in the system. This default behavior might be preferred in some application scenarios.
For example, an organization that imports invoices by using data entities might provide a centralized invoice processing team that is responsible for managing invoice errors for all divisions in the organization. In this scenario, it’s useful for the centralized invoice processing team to have access to invoice import jobs from all legal entities. Therefore, the default behavior meets the requirement from a legal entity perspective.
However, an organization might want to have invoice processing teams for each legal entity. In this case, a team in a legal entity should have access only to the invoice import job in its own legal entity. To meet this requirement, you can configure legal entity–based access control on the data jobs by using the Applicable legal entities menu inside the data job. After the configuration is done, users can view only jobs that are available in the legal entity that they are currently signed in to. To view jobs from another legal entity, users must switch to that legal entity.
Clean up the staging tables
You can clean up staging tables by using the Staging clean up feature in the Data management workspace. You can use the following options to select which records should be deleted from which staging table:
- Entity – If only an entity is provided, all records from that entity’s staging table are deleted. Select this option to clean up all the data for the entity across all data projects and all jobs.
- Job ID – If only a job ID is provided, all records for all entities in the selected job are deleted from the appropriate staging tables.
- Data projects – If only a data project is selected, all records for all entities and across all jobs for the selected data project are deleted.
Lab – Explore the Data management workspace
Scenario
In this lab, you will explore some of the features in the Data management workspace in the company USMF.
- Go to Workspaces > Data management.
- You will see information The entity list is being refreshed. You may continue your work while this happens. The completion status of this operation can be found in the message center.
- Let this job work for several minutes (you may receive an error later if you close it too early), then Close this information window.
- Select the Templates tile.
- Select the Load default templates button by the selecting ellipsis (…) at the top of the page, next to the Power Apps icon.
- Select the Load all button.
- When the operation is completed, select the 020 – GL Shared record in the left section.
- View available entities for General ledger shared data.
- In the Entities list, double-click Chart of Accounts, and view the available entities for Chart of Accounts.
- Close the Target entities page.
- Expand the Template details FastTab of the Template page to see the list of entities.
- Close the Template page.
- Select the Data entities tile. View available entities in Finance and Operations apps.
- Select any of the entities of your choice, such as Accountants.
- Select Entity structure in the top menu, to see the data source. Here, you can enable or disable running business logic in your project. For instance, for data migration, you might have modified the settings of certain configurations to meet customer requirements; however, the legacy data would violate the new rule, so you might need to make the decision to turn off the rule for historical data.
- Select Target fields in the top menu. Here you can view and edit the target fields, such as enabling or disabling the Table configuration key status.
- Close the Target fields page.
- Close the Entity structure page.
- Select Entity module view in top menu of the Target entities page. This provides better visibility by grouping entities for each category and sub category of nodes, and also by grouping the entity models.
- In the tree on the left, expand All\AccountsPayable and select Transaction.
- In the tree, expand All\GeneralLedger and select Document.
- Close the Entity module view page.
- Select Entity category view in the Target entities page.
- In the tree, expand All\Configuration and select SystemAdministration.
- In the tree, expand All\Reference and select AccountsReceivable.
- Close the Entity category view page.
- Close the Target entities page.
- Select the Data task automation tile.
- Select Load default tasks to open the drop-down dialog.
- From the drop-down, select a value, MS_Sample_DMFManifest.
- Select Load when the Manifest is loaded successfully.
- Select Cancel.
- Close the Data task automation page.
- Select the Configure data source tile. Here, you can view, edit, and create data types such as CSV, Excel, and Package.
Lab – Export data using the Data management workspace
Scenario
In this lab, you will export data from the All customers entity using the Data management workspace.
- In the company USMF navigate to Workspaces > Data management.
- You will see the message The entity list is being refreshed. You may continue your work while this happens. The completion status of this operation can be found in the message center.
- Let this job work for several minutes (you may receive an error later if you close it too early), then Close this information window.
- Select the Export tile on the page.
- Specify the following information on the page:
- Group name – Customers Export
- Description – Customer Export
- Data project operation type – Export
- Project category – Project
- Generate data package – Yes
- Select Save in the Action Pane.
- In the Selected entities FastTab, select Add entity.
- Specify the following information in the Add entity dialog:
- Entity name – Customers V3
- Target data format – EXCEL
- Select fields – Importable fields
- Select Add. A new line will be created with the entity information you defined.
- Review any warnings, and then select Close.
- Select the entity line, and then select Export in the Action Pane. The data job will execute.
- Select Refresh when the job is complete. You will receive a notification that the export has completed.
- Select Download package in the Action Pane. A .zip file will download.
- Open the .zip file and then open the Excel file that is in the .zip file.
- Here you will see all the data that exported from Finance and Operations.

Leave a comment